

Glassware Display Guide for Collectors: Styling & Safety
The most effective way to display glassware is to combine balanced composition, multi-angle LED lighting at roughly 30°, and physical anchoring for every piece that could tip or slide. That’s the short version. The longer version is what separates a shelf that looks like a thrift store donation pile from one that looks like a gallery installation. Thegildedcup’s curation approach puts three things first: edit ruthlessly, light intentionally, and secure everything before you step back to admire it.
Quick-start checklist:
- Group pieces in odd numbers (ones, threes, fives) and vary heights immediately
- Add LED lighting at roughly 30° from multiple directions to reveal form and spark reflections
- Secure small pieces with museum putty; use Command heavy-duty strips (rated up to 16 lb when installed per instructions) for lightweight wall mounts
Table of Contents
- What should you buy before building a glassware display?
- Core visual rules that make glass displays work
- Which display method fits your space and collection?
- How should you light glassware for maximum sparkle?
- Step-by-step: arranging a shelf from empty to finished
- How do you secure and maintain glassware safely?
- Installation checklist: adhesives, anchors, and when to call a pro
- What tools and materials do you actually need?
- Room-by-room setup ideas
- How should you arrange glassware by type?
- What complementary decor works without creating clutter?
- How do you keep a display fresh with seasonal rotations?
- Key Takeaways
- What most collectors get wrong about displaying glass
- Thegildedcup: curated glassware for collectors who display with intention
- Useful sources
What should you buy before building a glassware display?
Gather these before you start, or you’ll stop mid-project:
- Museum putty — for stabilizing small or top-heavy pieces on any surface
- Command heavy-duty adhesive strips — match the strip’s weight rating to your lightest pieces; never exceed the rated load
- LED puck or strip lights — warm white 2700–3000K for a cozy glow; 3000K for brighter, crisper clarity on crystal
- Acrylic or invisible risers — create height variation without adding visual bulk
- Microfiber cloths — at least two; one damp, one dry, for cleaning before and after arranging
- Isopropyl alcohol — for surface prep before applying adhesives
- Level and measuring tape — non-negotiable for floating shelves
Weigh your heaviest piece before buying strips or anchors. A single crystal decanter can easily hit 4–6 pounds, and a shelf of them adds up fast.
Core visual rules that make glass displays work
Odd-numbered groupings and varied heights are the single most reliable starting point for any glass arrangement. Three pieces at different heights read as intentional; four at the same height reads as a row of soldiers.
Negative space is not wasted space. Overcrowding pieces blocks their ability to catch and reflect light, which is the whole point of displaying glass in the first place. Even a maximalist shelf needs breathing room between clusters.
A few rules worth keeping:
- Color story: limit yourself to two or three dominant tones per shelf; repeating a material (brass, clear crystal, amber) creates cohesion without matching everything exactly
- Scale and proportion: anchor each grouping with one tall or visually heavy piece, then build around it with smaller items
- Depth: place taller pieces toward the back, shorter ones in front; use risers to lift mid-ground pieces so nothing disappears behind another
Pro Tip: Pick one focal anchor piece per shelf — your best piece, your most interesting silhouette, or the one with the strongest provenance. Build the rest of the grouping outward from it in ones, threes, or fives. Everything else should support that anchor, not compete with it.
Which display method fits your space and collection?
Choose the method based on how much visibility and permanence you want.
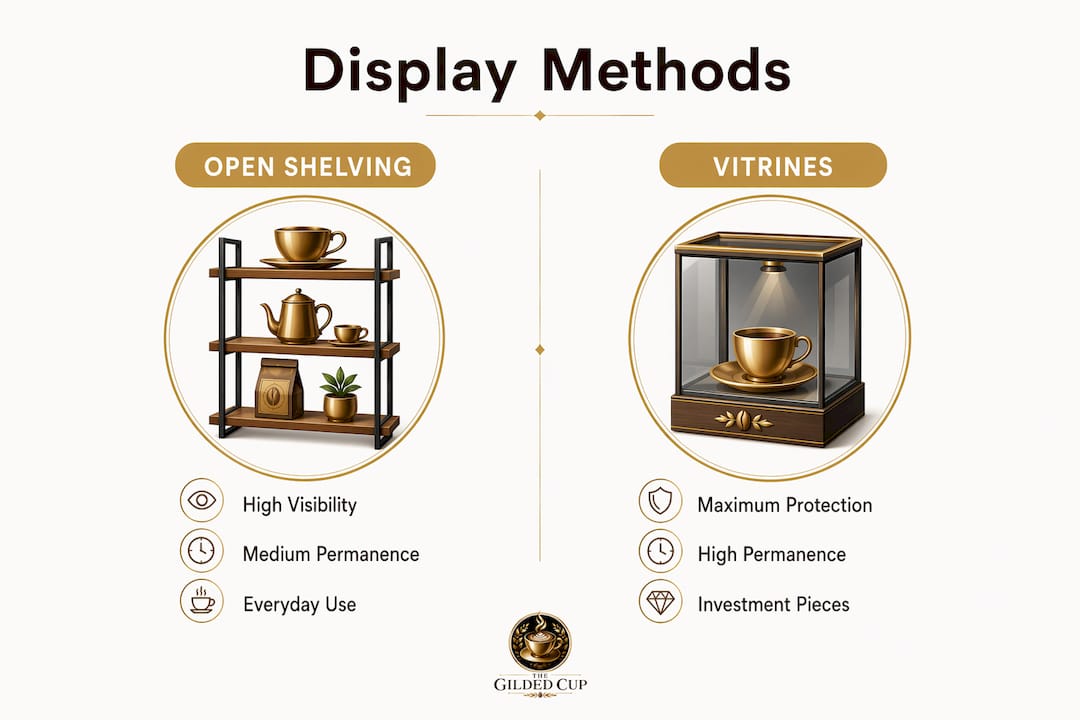
| Method | Visibility | Permanence | Best for | Installation |
|---|---|---|---|---|
| Open shelving | High | Medium | Everyday pieces, accessible collections | Moderate |
| Glass-front cabinet | High | High | Mixed collections, dust protection | Low (freestanding) |
| Floating glass shelves | Very high | High | Statement pieces, minimal look | High (wall anchors) |
| Freestanding vitrine | Medium | Low | Valuable or fragile pieces | None |
| Wall-mounted display | High | High | Art glass, single statement pieces | High |
| Pedestal | Very high | Low | Large sculptural pieces | None |
Vitrines offer the best protection for investment-level pieces. Open shelving gives you daily access but exposes pieces to dust and accidental contact. Floating glass shelves can be custom ordered in different thicknesses and glass types, including safety glass for higher-risk locations.
For renters or anyone avoiding permanent wall penetration, tension-mounted display poles and removable mounting systems are a practical alternative that still look intentional.
Weight matters for every method. Adhesive strips support up to 16 pounds when installed correctly; anything heavier needs wall anchors or a freestanding solution.
How should you light glassware for maximum sparkle?
Position LED lights at roughly a 30° angle from multiple directions. A single overhead source creates flat, harsh shadows. Two or three angled sources reveal the three-dimensional form of each piece and trigger the refractions that make glass worth displaying.
Fixture choices:
- LED puck lights — easy to install inside cabinets, no wiring required
- Diffused LED strip lights — even wash of light under shelves; add a diffuser to soften hot spots
- Adjustable track or spotlights — best for open shelving; mount 18–24 inches from the pieces and angle at 30°
- Dimmers — non-negotiable; daytime and evening viewing need different intensities
Avoid fluorescent lights entirely. They flatten color and generate UV that fades colored glass over time. Direct sunlight is equally damaging. For valuable pieces near windows, UV-filtering film is worth the investment.
For smart home setups, programmable controls let you shift from bright daytime clarity to warm evening mood lighting without touching a fixture.
Step-by-step: arranging a shelf from empty to finished
Edit first. Pull everything off the shelf and only put back what genuinely earns its place.
- Clean the empty shelf with a microfiber cloth; remove dust and any adhesive residue
- Choose your anchor piece and place it slightly off-center on the shelf
- Build odd-numbered groups around the anchor, varying heights with risers
- Check sight lines from your primary viewing angle — seated, standing, and from across the room
- Adjust spacing — aim for 6–12 inches between larger pieces; smaller items can cluster more tightly
- Create foreground/background depth by layering pieces at different distances from the shelf edge
- Step back and photograph the arrangement before calling it done
Pro Tip: The camera catches compositional imbalances your eye misses in real time. A quick phone photo from across the room will show you immediately if one side is too heavy or a riser is creating an awkward gap. Adjust based on the photo, not your gut feeling standing two feet away.
How do you secure and maintain glassware safely?
Secure the display before you clean it, and clean it before you load it. Both steps protect the pieces and the investment.
Securing options:
- Museum putty under small or top-heavy pieces — invisible, residue-free, repositionable
- Shelf lips or edge guards on open shelving to prevent forward slides
- Adhesive strips rated for the load; use multiple contact points for bonded mounts
- Wall anchors or museum cables for heavier vitrines and cabinets
Cleaning:
Spray cleaning solution onto a microfiber cloth first — never directly onto the glass or shelf surface. Buff dry thoroughly. In enclosed cases, trapped moisture causes fogging and can damage delicate finishes over time.
Environmental controls:
- Target 45–55% relative humidity for mixed-media collections
- Keep displays away from heating vents, air conditioning units, and drafty windows
- Use silica gel packets inside small enclosed cases to absorb excess moisture
- UV-filtering film on nearby windows protects colored and vintage glass from fading
Installation checklist: adhesives, anchors, and when to call a pro
Measure twice, match hardware to the load, and prep every surface before applying anything.
- Weigh your items — total the load for each shelf or mount point
- Mark your layout with paper templates taped to the wall before drilling anything
- Clean surfaces with isopropyl alcohol; let dry completely before applying adhesives
- Test-fit shelves or mounts without adhesive first
- Apply adhesive strips or anchors according to manufacturer instructions
- Allow full cure time — adhesive mounts often need 24 hours before loading any weight
- Load lightest pieces first and check stability before adding heavier items
Command heavy-duty adhesive strips support glass pieces up to 16 pounds when surfaces are cleaned and installation instructions are followed. Use multiple strips and distribute contact points evenly for any piece near that limit.
Call a professional for heavy freestanding vitrines on uneven floors, masonry wall anchors, or any electrical lighting runs inside built-in cabinetry.
What tools and materials do you actually need?
Keep a basic kit assembled so you can adjust displays without hunting for supplies:
- Measuring tape and level — for shelves and alignment
- Cordless drill and wall anchors — for permanent installations
- Command heavy-duty adhesive strips — for lightweight wall mounts
- Museum putty — for stabilizing pieces on any surface
- Acrylic risers — create height variation without adding visual weight; clear acrylic disappears under the piece
- LED puck or strip lights — warm white, dimmable
- Microfiber cloths — two minimum; one for cleaning, one for buffing dry
- Isopropyl alcohol — surface prep before any adhesive application
Acrylic risers are worth calling out specifically. They lift a piece without the visual bulk of a wooden block or ceramic stand, which keeps the focus on the glass itself.
Room-by-room setup ideas
Kitchen: Combine utility with display. Keep everyday glassware at eye level and accessible; use matching sets for visual calm. Reserve one shelf for a small curated vignette with a pitcher, two or three glasses, and a single accent piece.
Dining room: This is where stemware earns its spotlight. Use cabinet lighting and group wine glasses, champagne flutes, and serving pieces by function. A central anchor vignette — a decanter or a tall crystal piece — gives the eye a place to land. For seasonal tablescape ideas, rotating a few accent pieces around holidays keeps the display feeling current.
Living room: Curated vignettes with artful backdrops work best here. Use risers, reflective surfaces, and intentional negative space. Keep direct sunlight off the display entirely.
Home bar: Accessible shelving at elbow height, grouped by drink type. Mood lighting matters here more than anywhere else. Whiskey glasses, highballs, and coupes each get their own cluster, making the bar functional and visually organized at the same time.
How should you arrange glassware by type?
Stemware and tumblers follow different logic. Stemware — wine glasses, flutes, coupes — is fragile at the base and needs space between pieces to prevent rim contact. Store and display stems upright, never inverted on a hard surface, with at least an inch of clearance between each glass.

Tumblers, rocks glasses, and highballs are sturdier and can be grouped more tightly. They work well in clusters of three or five, staggered by height. Mixing stemware and tumblers on the same shelf tends to look chaotic; keeping them in separate groupings or separate shelves reads as intentional. For functional drinkware organization, grouping by use — cocktail, wine, everyday — also makes the display practical, not just decorative.
What complementary decor works without creating clutter?
The rule is simple: every non-glass item on the shelf should either recede visually or add a texture the glass cannot provide. A small linen napkin folded beneath a decanter, a single brass candlestick, a short stack of books — these add warmth without competing.
Avoid anything with strong pattern or color that pulls the eye away from the glass. Neutral backdrops (soft white, pale gray, warm linen) let colored or crystal glass do the work. Reflective surfaces behind a display, like a mirrored cabinet back, amplify light and create the illusion of more depth and more pieces.
Limit non-glass accents to one or two per grouping. Three glass pieces and one complementary object is a vignette. Three glass pieces and four objects is a shelf that needs editing.
How do you keep a display fresh with seasonal rotations?
Rotating pieces seasonally does two things: it keeps the display visually interesting and it gives stored pieces regular inspection for chips or cloudiness. A simple four-rotation calendar works well: swap accent pieces in winter, spring, summer, and fall without rebuilding the entire display each time.
Keep a small inventory of pieces in rotation storage, wrapped in microfiber or felt. When you swap, clean the shelf before restocking. Seasonal changes are also the right moment to reassess whether a piece still earns its place on the shelf or belongs in storage permanently.
Key Takeaways
A well-executed glass display comes down to one principle: curate like a museum, light like a gallery, and anchor like you mean it.
| Point | Details |
|---|---|
| Edit before you arrange | Remove everything and only return pieces that earn their place; clutter kills the display. |
| Light at 30° from multiple angles | LED lights at 3000K positioned at roughly 30° reveal form and trigger refractions. |
| Secure every piece | Museum putty for small items; Command strips rated up to 16 pounds for wall mounts; anchors for heavy pieces. |
| Use odd groupings and negative space | Groups of one, three, or five with breathing room between clusters look intentional, not crowded. |
| Thegildedcup for curated pieces | Thegildedcup offers detailed product descriptions and high-quality imagery to help collectors choose display-worthy glassware. |
What most collectors get wrong about displaying glass
The conventional wisdom says “more is more” when you have a collection worth showing. That instinct is almost always wrong. The pieces that get the most attention in a well-styled display are usually the ones with the most space around them, not the ones surrounded by ten neighbors.
There’s also a tendency to treat lighting as an afterthought — something you add once the shelf is full. Lighting should be the first decision after choosing the display method, not the last. The angle and color temperature of your light source determines whether a piece looks alive or flat, and no amount of rearranging fixes bad lighting after the fact.
One thing grading experience makes clear: a piece’s finish and provenance should drive where it sits in the display, not its size. A small Depression-era goblet with an unusual color deserves a front-and-center riser spot more than a large but common tumbler. Let the most interesting piece lead, and build the grouping around what makes it interesting.
Thegildedcup: curated glassware for collectors who display with intention
Collectors who want pieces that photograph well, hold their value, and anchor a display without apology will find Thegildedcup’s selection worth a close look. The site offers detailed product descriptions and high-quality images that make it easy to assess a piece’s finish, scale, and display potential before it arrives at your door.

Thegildedcup publishes this guide as part of its commitment to helping collectors build displays that are both beautiful and lasting. If you’re building a curated glassware collection from scratch or adding a statement piece to an existing shelf, browse the full selection at Thegildedcup and use the detailed descriptions to match each piece to your display’s scale and lighting.
Useful sources
These are the primary references used throughout this guide. Each one covers a specific aspect of glass display in more depth.
- How to Display Glass Art Pieces: Expert Guide 2025 (Rocketroseat) — covers adhesive weight limits, lighting angles, and removable mounting options for renters; the most practically detailed source in this list
- A Complete Guide to Creating a Display with Glass Shelves (ABC Glass & Mirror) — explains odd-number grouping rules and custom glass shelf options including safety glass
- 20 Sophisticated Ways to Style Your Glass Display Cabinet (Home as We Make It) — strong on negative space, acrylic risers, reflective backdrops, and seasonal rotation strategies
- How to Arrange Your Glass Display Cabinet for Maximum Impact (KLG Glass) — cleaning technique detail, specifically the microfiber-first method for avoiding fogging in enclosed cases
- How to Decorate Glass Cabinets (HandyCraftsHub) — practical color coordination and lighting temperature guidance for kitchen and dining room setups
- How to Display Vintage Glassware (Crystal House) — covers environmental factors, humidity, UV exposure, and protection strategies for antique and vintage pieces
- How to Display Depression Glass (Storables) — useful for collectors of colored vintage glass; covers background choice, lighting diffusion, and cabinet selection criteria
Use these sources to dig deeper into any specific area — lighting hardware, shelf installation, or vintage piece preservation — beyond what this guide covers.